
VALVE STEM PACKING
The purpose of valve packing is to prevent leakage. In a typical valve, the gland follower is tightened until there is no leakage. The valve is then test-operated to make sure that the packing is not compressed so tightly that the valve does not turn easily.
Types of Packing
Packing comes in two types; in pre-shaped rings or in rope form which is cut to size. The common pre-shaped ring packing material is Teflon.This plastic material which is self lubricating. Normally the Teflon rings are held in place with a spring below the gland follower.
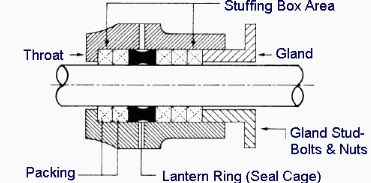
Another form of this type of packing is called “Chevron” packing. Teflon or rubber packing rings are shaped like a “V” (Chevron) and placed in the stuffing box as shown in Figure.The process pressure forces the edges of the chevrons outwards against the shaft and stuffing box wall to produce a good seal. Chevron packing is very common in hydraulic and pneumatic systems.
Packing replacement
Removing Old Packing
The most common sign of packing damage is too much leakage from the gland. If you can’t control this leakage by adjusting the gland follower, then the packing should be replaced.
Before the packing in a valve can be replaced, the valve must be locked off using the platform’s usual procedures. Next you must check manufacturer’s specifications to make sure that the old packing is replaced with packing of the right size and type. Then you must carry out the following procedures.
1. Loosen the gland follower nuts.
2. Swing open the gland follower dog bolts.
3. Open (or remove for a split type) the gland follower.
4. Remove the first few packing rings. The easy way is to use a packing tool. This works exactly like a corkscrew.
5. Take care not to scratch the shaft with the packing tool.
6. If there is a lantern ring, remove this with a piece of wire bent into a hook.
7. Remove the remaining packing rings.
8. Make sure all packing scraps have been removed.
9. Check the old packing and the shaft to see if it is only worn, or if there is a more serious reason for the leakage
Installing New Packing
1. Make sure that the exposed portion of the shaft is completely clean. It is important to get rid of all the grit particles so that they do not get pushed into the stuffing box with the new packing.
2. Clean the shaft and stuffing box with a non-flammable, non-toxic solvent.
3. Brush down and then wipe the area with a clean rag.
4. If no manufacturer’s information is available, measure the gap between the shaft and the stuffing box.
5. Similarly, measure the depth of the stuffing box.
6. Measure the thickness of the lantern ring.
7. Calculate how many rings will be required.
8. Find a suitable mandrel (the same diameter as the shaft).
9. Wind the packing material round the mandrel as many times as the number of rings required.
10. Cut the rings with a sharp knife.
11. Check how many rings you need to put below the lantern ring. The correct number must be replaced; otherwise the lantern ring will not be in line with the lubricator.
12. Lubricate the rings with an anti-seize compound, so they will go in more easily.
13. Insert the packing rings and lantern ring one by one, pushing them into the stuffing box as far as they can go.
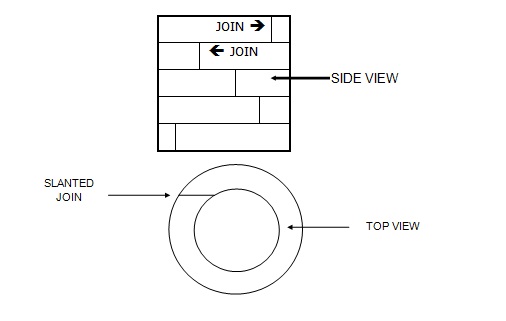
14. The joints of the rings should be staggered and cut on a slant as shown below.
Post time: Apr-28-2022